CNC WARRIOR: CNC Warrior SKS Quick Mag Release TSE##21850
$89.95
0
The SKS Quick Mag Release is an exciting new product that CMC Warrior developed in conjunction with one of their customers. It makes use of a standard AR-15 mag release button to drop SKS mags reliably and lightning fast!
This made-in-the-US product is being distributed in Canada by Matador Arms and being retailed by Colonel Mustard as from 28 April 2017 (yes, we have stock!)
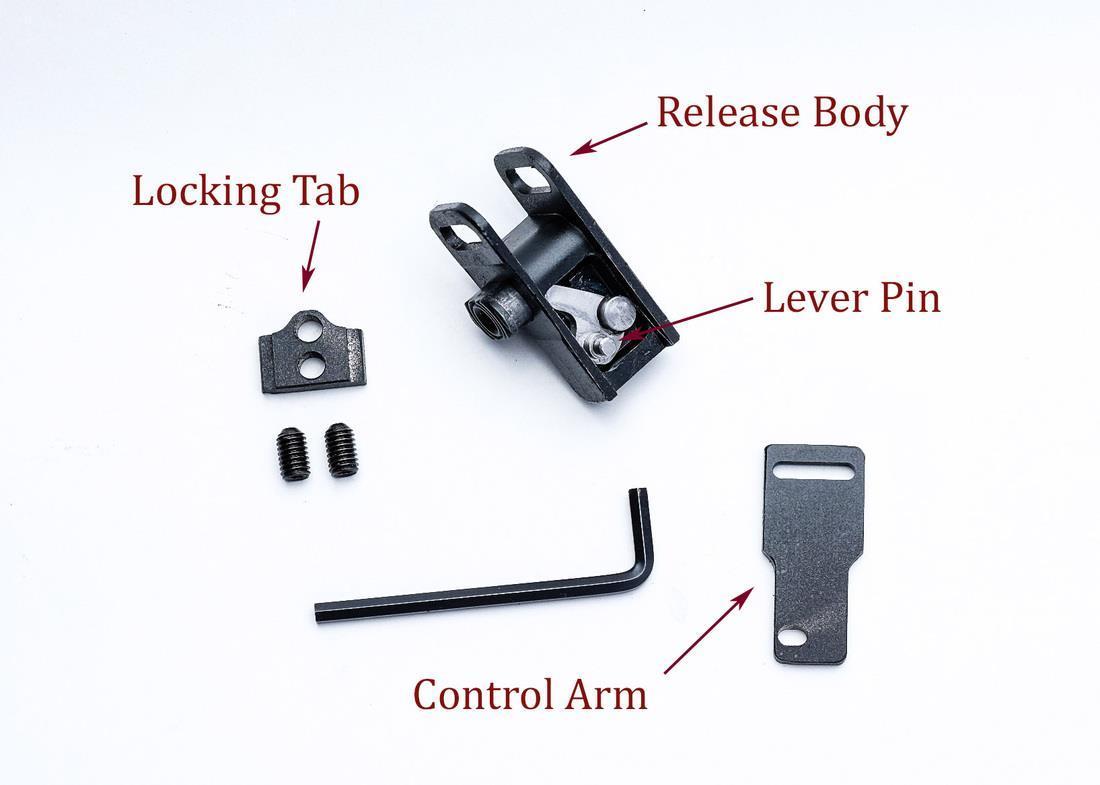
It can be installed in 5-10 minutes with a single hex-key wrench and no modifications to your gun. Just place it right in over your trigger guard and existing mag catch, push the custom machined nut into the mounting slot and tighten with 2 set screws.
It works with standard wood stocked SKS, the Sabertooth Mk 1 / Mk 2 and all known tactical stocks (in this case a Matador Arms Sabertooth Mk I - as shown in the video here: SKS Quick Mag Release). Please note the release button on the video has been swapped for a red one - you are getting a black one!
All internal components are made of heat treated 416 stainless steel for excellent wear and corrosion resistance.
The body is made from billet 6061 T6 aluminum, and coated with Class 3, black hardcoat.
Model: Matador Arms / CNC Warrior MACSKSQMR (MAC522)
ERROR
Installation Instructions:
Tools needed: Allen Key, Bit Driver (not required, but helpful)
Remove the trigger assembly from the rifle by activating the safety and pressing on the trigger group latch.
This step is not required but makes installation easier
Verify that the SKS cover latch is clean and moves freely back and forth.
Orientate the release body so that the button is on the same side as the SKS safety lever and slide the ears of the release body over the trigger loop.
Insert the locking tab from the right side (button and safety lever side) with the bell shape pointing down, then fit it into the slots of the release body.
Start and finger-tighten the set screws into the locking tab.
the release body can be tilted slightly for easier access to the set screws.
using a bit driver can make tightening the screws easier.
Orient the control arm so that the small hole is on the right side (button and safety lever side), then slip it over the SKS cover latch.
a small dab of grease or lubrication on the top of the control arm may be helpful.
Verify that the lever pin is forward, then slide the release body up to the top of the trigger group and fit the release body assembly to the control arm.
the cover latch may need to be pushed to the rear to allow the lever pin to mate with the small hole in the control arm.
Hold the release body in place and push the release button to verify that the lever pin and control arm are joined.
Verify that the release body and control arm are aligned along the bottom of the trigger group, then tighten the set screws.
alternate the screws at first, and the locking tab will self-center on the curve of the trigger loop, then tighten the lower screw all the way before finishing up with the top screw.
do not over tighten the set screws.
Stamped Trigger Groups
Because of the extra piece of the trigger loop on a stamped trigger assembly, the release body and control arm will appear to sit a little lower on the trigger loop. Verify that the control arm is not binding between the trigger loop extension and the release body and use the two set screws to level out the release body.
Please note: A valid PAL license will be required at checkout to purchase specific items according to Canadian firearms regulations.